

Ticket sales
Sell event tickets, season passes, and punch cards — QR codes, email delivery, and a dedicated staff scanner
Ticket sales lets you sell event tickets, festival wristbands, season passes, or amusement-park day passes. After payment the customer receives a unique QR code per ticket by email, and your staff scans those QR codes at the door using a dedicated ticket scanner.
Tickets are digital — they have no physical stock and no shipping method. Checkout automatically skips shipping if the cart only contains tickets.
Concepts in brief
- Event — a physical or logical event (e.g. Summer Festival 2026 or Theme Park). One event can have multiple ticket products under it.
- Ticket — its own product, belonging to a single event. Has a price, usage count (single vs. multi), an optional validity period, and its own sales window.
- Purchased ticket — an individual QR-coded ticket that's created after payment. One purchased ticket per quantity unit on a line item.
- Scan PIN — an event-specific PIN that staff enter in the scanner to access that event's scanning view.
The ticket sales hub
Open Products → Ticket sales in the dashboard sidebar.
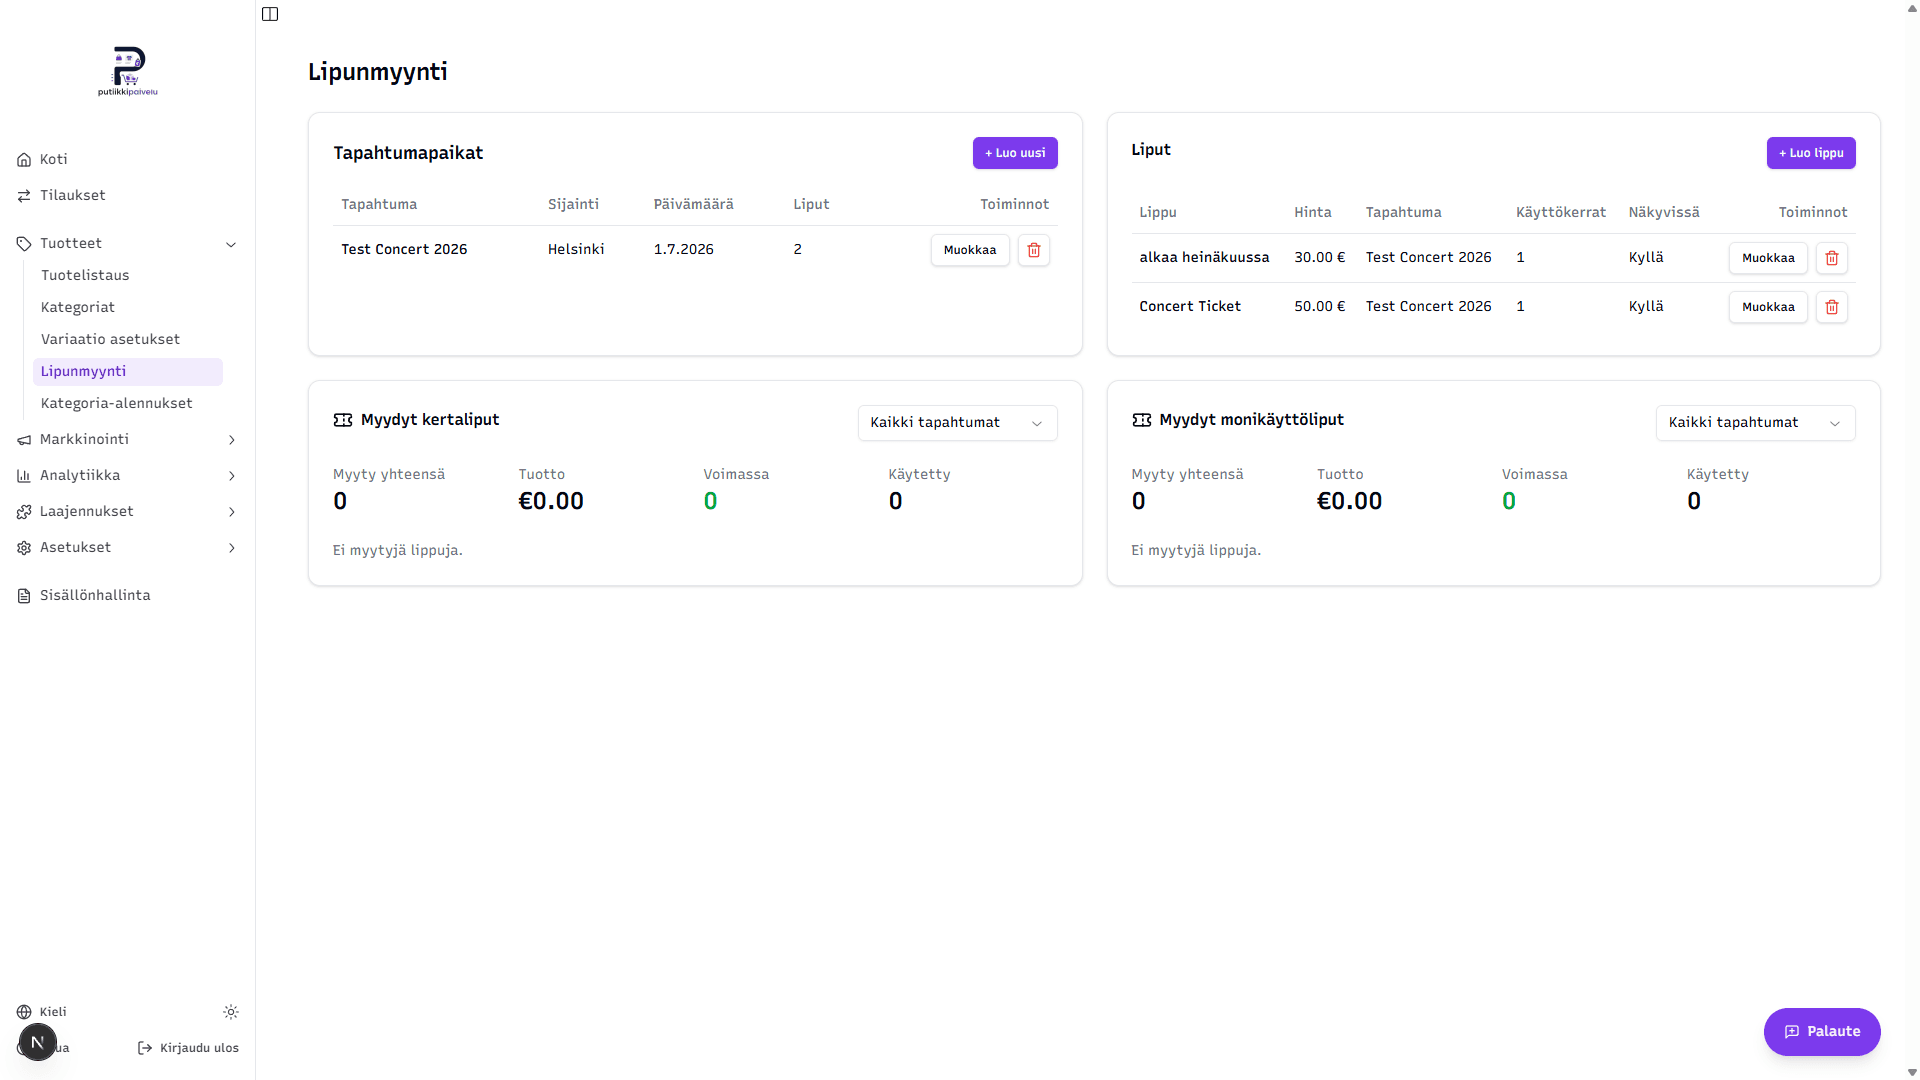
The page is split in two:
- Top — left: Events (managed via a dialog). Right: Tickets (you go to a dedicated create page).
- Bottom — sold tickets split into single-use and multi-use, with totals, revenue, and a status breakdown (Valid / Used / Cancelled / Expired).
1. Create the event first
You must have an event before you can create any tickets. Click the + Create new button on the Events card — a dialog opens.
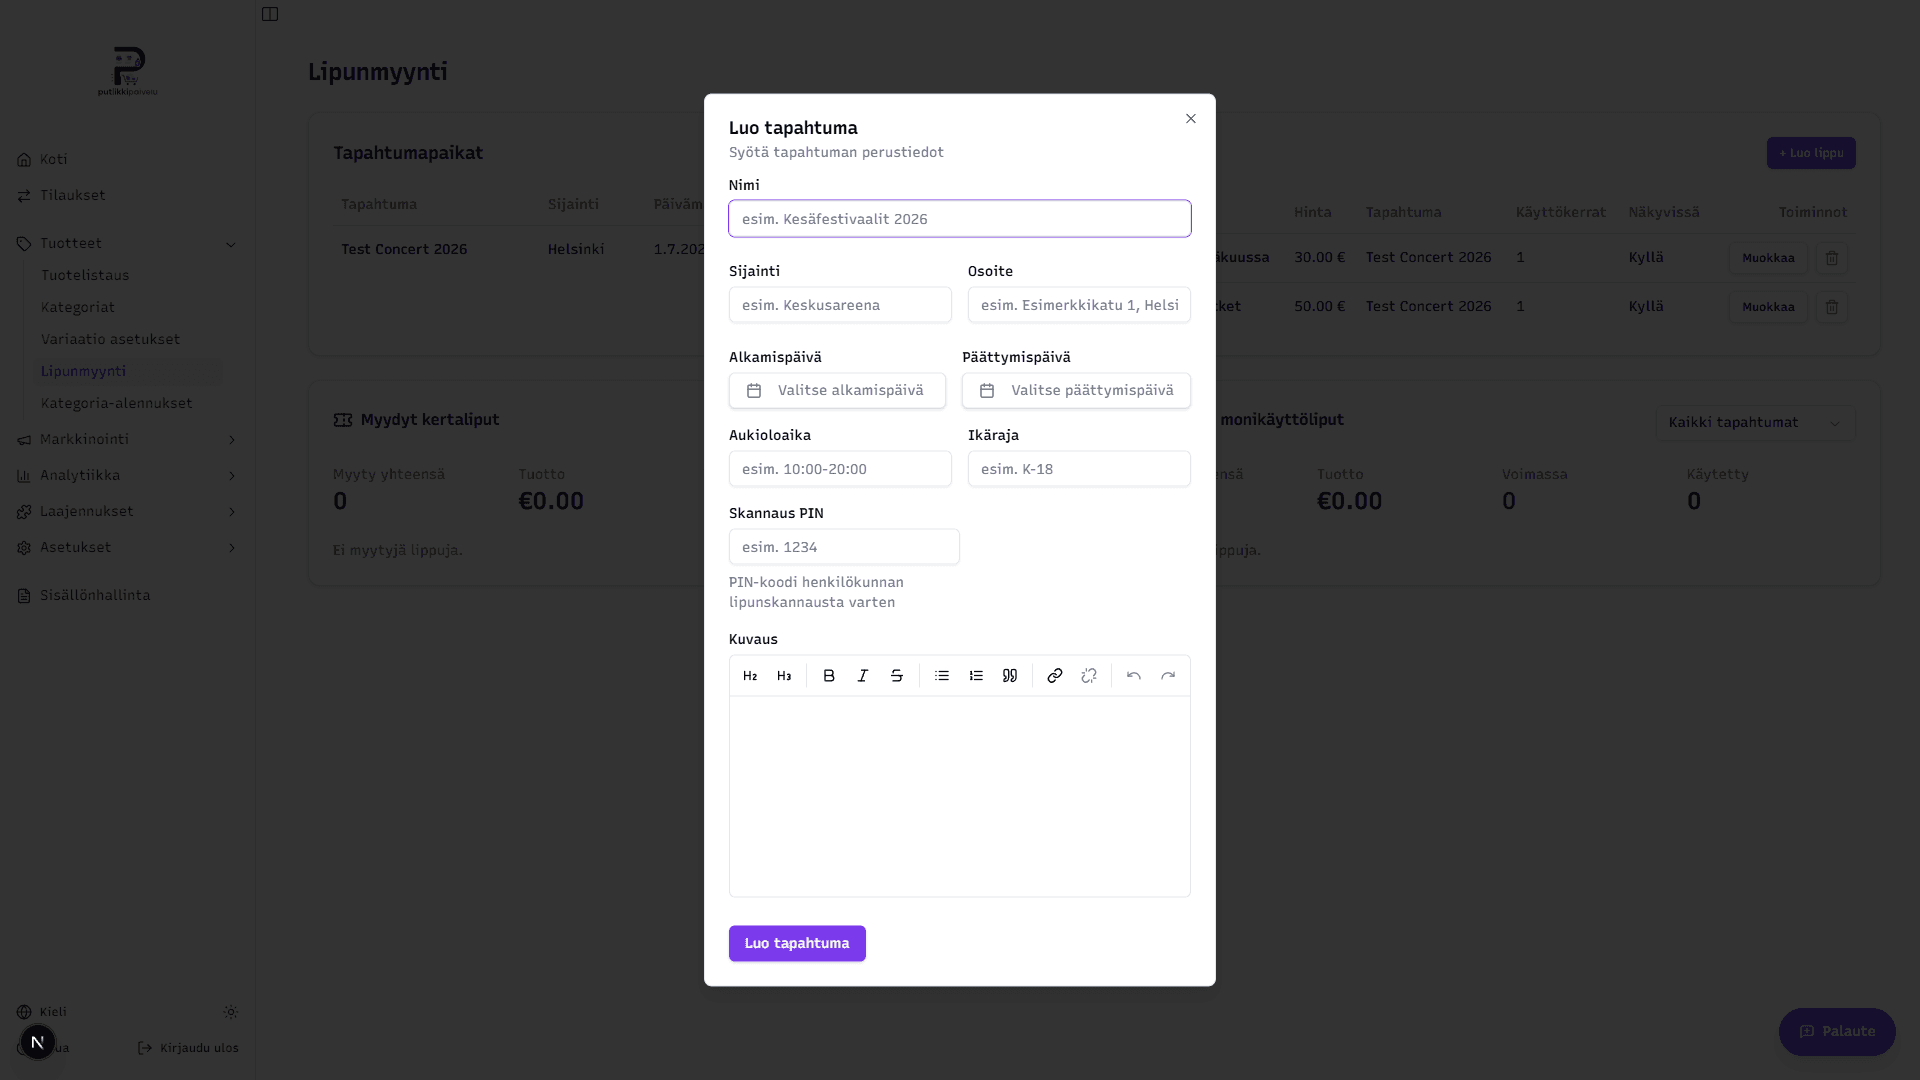
Fields
- Name (required) — the event's public name (e.g. Summer Festival 2026).
- Location (required) — city or venue (e.g. Helsinki or Central Arena).
- Address — street address. Shown to the customer on the ticket.
- Start date and End date — when the event runs. You can leave both empty for ongoing venues (e.g. an amusement park). The end date also doubles as the default validity end for tickets, if you don't set explicit validity days on the ticket itself.
- Open hours — free-form text field (e.g. 10:00–20:00).
- Age limit — free-form text field (e.g. 18+).
- Scan PIN — a numeric PIN your staff enters in the scanner to open this event's scanning view. Without a PIN the event won't appear in the scanner at all, so always set one if you intend to scan tickets at the door. Something like 1234 is fine — keep it separate from your other passwords, since you'll be sharing it with staff.
- Description — rich text description of the event. Supports formatting and links.
Click Create event when you're done. The event appears in the table at the top, where you can later Edit it or delete it via the trash icon.
Deleting an event
An event can't be deleted while there are valid purchased tickets attached to it. Cancel those tickets first (or remove the underlying orders) and the event becomes deletable.
2. Create a ticket
With an event saved, click the + Create ticket button on the Tickets card. You're taken to a dedicated Create ticket page.
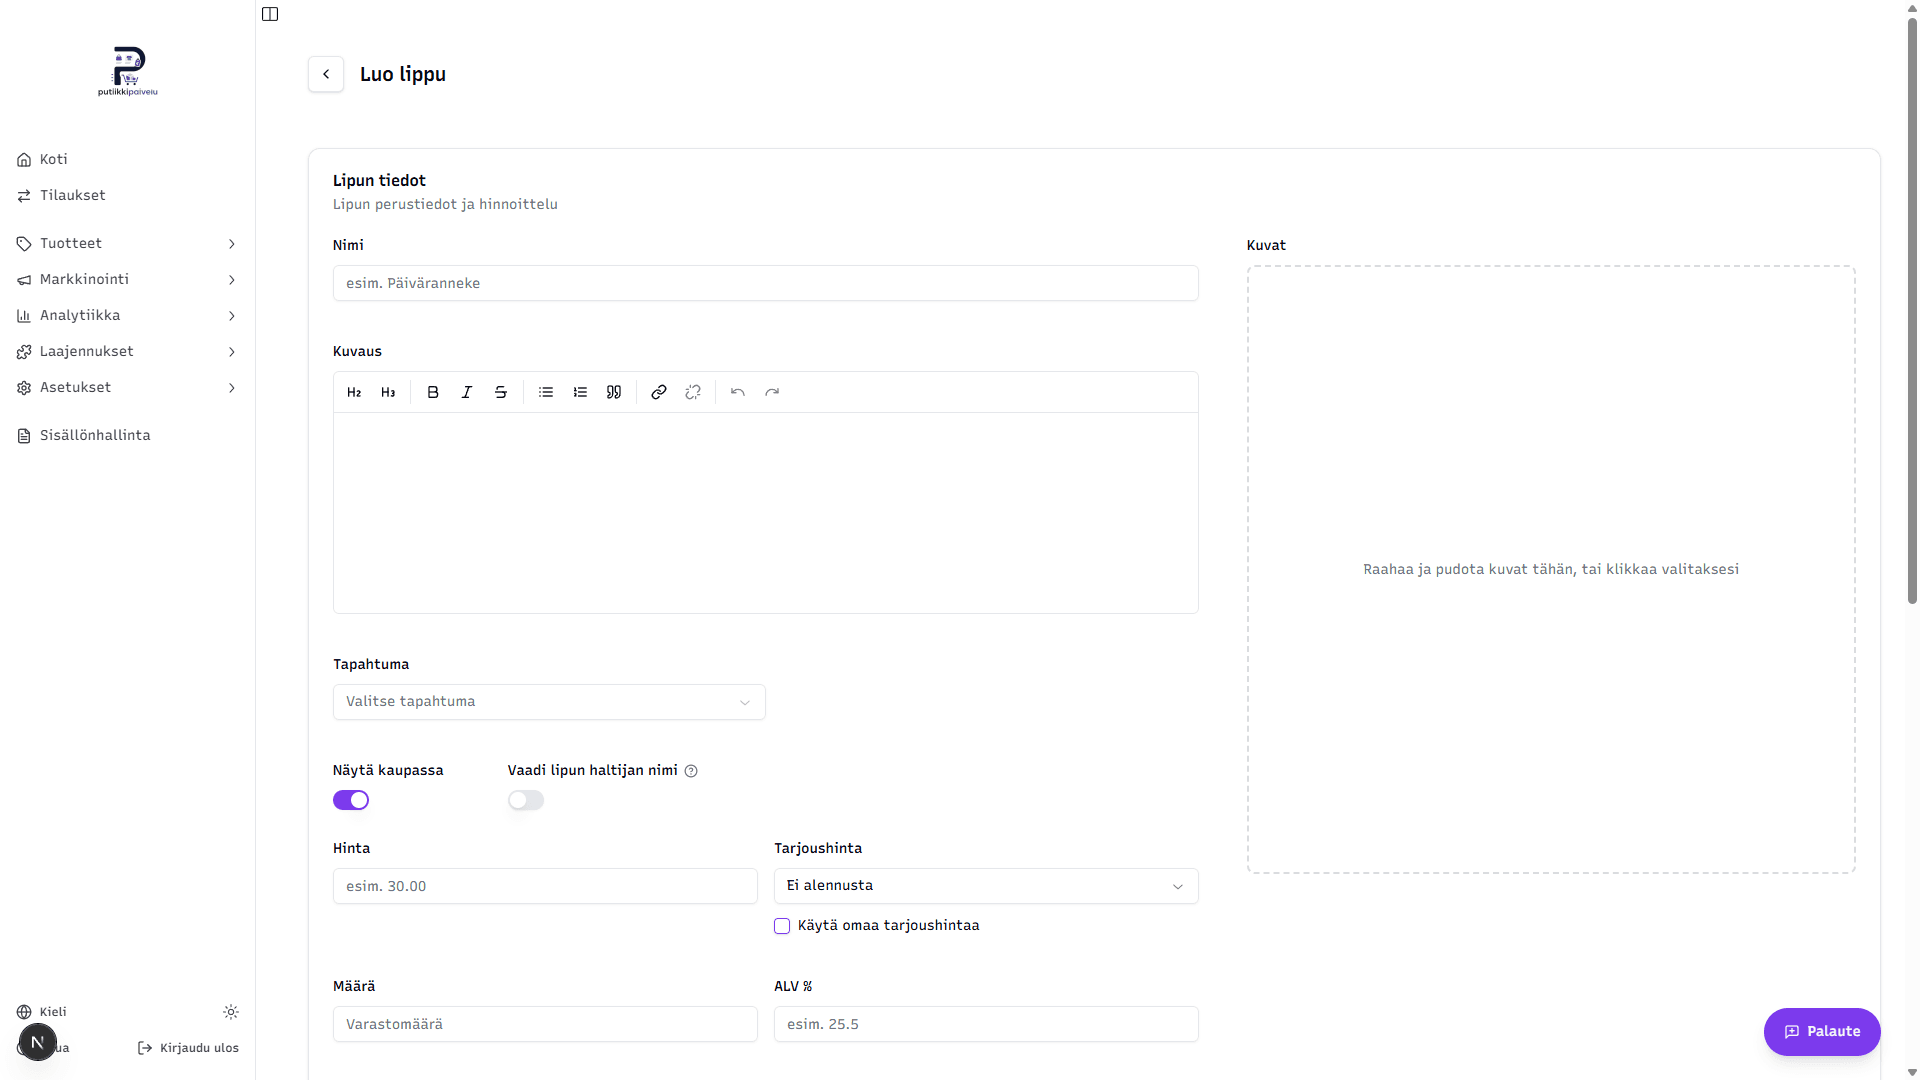
Basic info
- Name (required) — the ticket's name in the store (e.g. Day pass, VIP wristband, Season pass 2026).
- Description — rich text description shown on the product page in the store.
- Event (required) — dropdown with all the events you've created. A ticket can only belong to one event.
- Show in store — switch that decides whether the ticket is visible immediately or hidden until you flip it on.
- Require holder name — turn on if you want checkout to collect a first and last name for each individual ticket. Typically used for season passes and multi-day wristbands where staff verify identity at the door. The hint reads: "Recommended for season passes and multi-day tickets".
Pricing and quantity
- Price (required) — in euros, VAT included.
- Sale price — either a preset discount percentage from the dropdown, or a custom sale price in euros if you check Use custom sale price.
- Quantity — total tickets available for sale. Leave empty for unlimited inventory.
- VAT % — the ticket's VAT rate. Finland's standard rate is 25.5. Empty falls back to the store-level default.
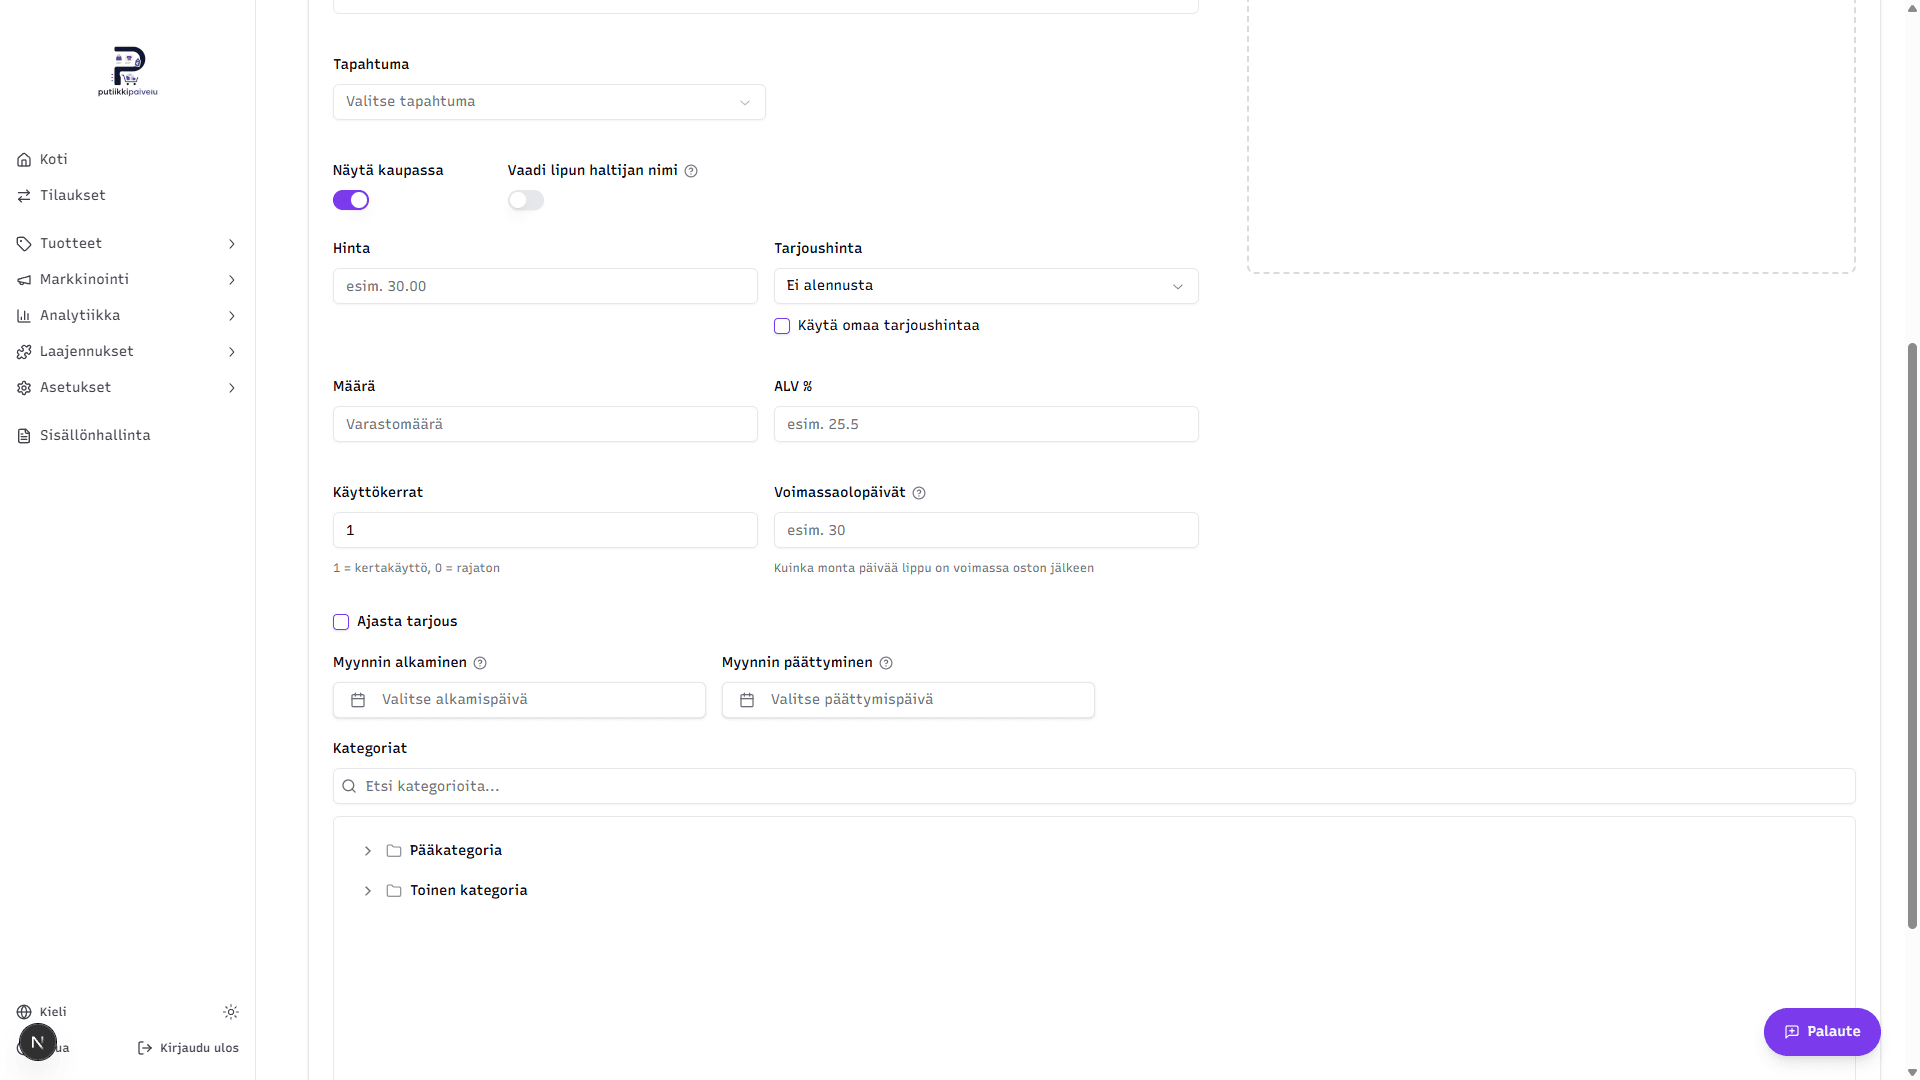
- Schedule sale — you can give the discount a start and end date. The discount is only active during that window.
Usage and validity
-
Usage count (default 1) — how many times one purchased ticket can be scanned in:
- 1 = single-use ticket (e.g. concert ticket)
- 0 = unlimited (e.g. season pass — same card works for the whole season)
- A higher number (e.g. 10) = punch card with that many entries (e.g. 10-visit gym card)
-
Validity days (optional) — how many days after purchase the ticket is valid. E.g. 365 for a yearly card.
- If empty and the event has an end date, the ticket is valid until that end date.
- If both are empty, the ticket is valid indefinitely.
Sales window
- Sales start (optional) — when the ticket becomes purchasable. Empty = on sale immediately.
- Sales end (optional) — when sales end. Empty = on sale indefinitely.
Use the sales window for things like early bird pricing — create two separate ticket products with non-overlapping sales windows.
Categories and image
- Categories (at least one required) — a ticket is a product and needs at least one category to show up correctly in the store. Consider creating a dedicated Tickets category.
- Images (right column, max 1) — a promo image for the event, shown in the store listing and on the product page. The aspect ratio matches your store setting (1:1 or 3:4).
You need an event and a category first
If you don't have any events or any categories yet, the create-ticket page shows a banner telling you to create whichever is missing. Create an event and at least one category before your first ticket.
Click Save to finish. The ticket appears immediately in the Tickets table on the dashboard, and — if Show in store is on — in the storefront too.
What happens when a customer buys a ticket
- The customer adds the ticket to their cart and pays via Stripe or Paytrail.
- Payment is confirmed (via webhook) → the server automatically creates one purchased ticket (
PurchasedTicket) per quantity unit, each with its own unique QR code. - The customer receives a ticket email containing:
- All tickets clearly listed with their QR images and order details
- A PDF attachment (
liput-{order-number}.pdf) for printing or showing on the phone
- Each ticket's status is Valid until it's scanned in or cancelled.
Shipping is skipped on ticket-only orders
If the cart contains only tickets, checkout doesn't ask for a shipping method or address. If the cart also contains physical products, shipping is requested for those — and the tickets ship with the same payment.
Ticket holder names
If a ticket has Require holder name turned on, checkout collects a first and last name for each individual ticket at purchase time. The names are saved to the purchased ticket and shown:
- In the customer's ticket email and PDF
- In the scanner during validation, so staff can verify identity
For single-use tickets a name isn't always needed, so collecting one just adds extra clicks at checkout. If you do want to sell a ticket to a specific person (e.g. a named admission ticket), turn the setting on for the single-use ticket too.
Reviewing sold tickets in the dashboard
The bottom of the Ticket sales page shows sold tickets in two tables:
- Sold single-use tickets — tickets where usage count is 1
- Sold multi-use tickets — tickets where usage count is 0 or > 1 (this table also shows the holder's name if Require holder name was on)
The stats show total sold count, total revenue, and a status breakdown. You can filter by event in the dropdown.
Managing tickets from the order page
The individual order page (Orders → [order number]) has a Tickets section if the order contained tickets. From there you can:
- Resend ticket email — re-sends the ticket email to the same address using the existing QR codes (the codes don't change, so any prints the customer already has still work). Use this when the customer reports losing the email.
- Cancel ticket — flips the ticket's status to Cancelled and it no longer works in the scanner. Each ticket has its own button.
- Reactivate ticket — a cancelled ticket can be flipped back to Valid if you change your mind.
Refunds don't auto-cancel tickets
Refunding an order does not automatically cancel the purchased tickets. If you want a refunded order's tickets to stop working, manually cancel them in the order's Tickets section after the refund.
The staff ticket scanner
The ticket scanner does not live in the dashboard — it's part of the storefront and is reachable at /scanner. Staff open it from their phone or tablet at the venue.
Scanner flow
- Staff opens
https://yourshop.com/scanner(or the same path under your own domain). - They see a list of events that have a Scan PIN set. Events without a PIN don't appear.
- They pick an event and enter the PIN.
- The PIN is verified and the event's scanning view opens, with two tabs:
- Use ticket — scan a QR (or enter the code manually); the ticket is consumed immediately.
- Check ticket — read-only, doesn't change the ticket's state. Useful for verifying authenticity or status without burning a usage.
- After scanning, a green or red result card appears with the ticket's details:
- Green → ticket was valid and has been logged as used
- Red → ticket isn't accepted (cancelled, already used, expired, wrong event, or not found)
What happens behind the scenes
The scanner is bound to only the chosen event. If staff try to scan a ticket from a different event, the response is a red "Ticket belongs to a different event" card. This prevents tickets from one of your other events from being burned in the wrong place — by mistake or on purpose.
In addition:
- Before consuming a ticket, the system checks the status is Valid, the validity period hasn't passed, and there are usages left.
- If a usage is available,
usedCountincrements by one andlastUsedAtupdates. When usages run out, the ticket flips to Used. - Expired tickets are automatically marked Expired on the first attempt.
- The PIN doesn't persist across browser sessions — it's asked again if staff close the browser and reopen it later.
Scanner availability
The ticket scanner is part of the storefront (Putiikkipalvelu's official storefront template). If your store uses that template, /scanner is available automatically — all you need to do is set a Scan PIN on the event and share the URL + PIN with your staff.
Ticket statuses
| Status | What it means |
|---|---|
| Valid | Ticket is good and usable |
| Used | Usages exhausted; ticket no longer works |
| Expired | Validity period passed |
| Cancelled | Manually cancelled from the order page (or never re-activated for a refunded order) |
Common use cases
| Use case | Usage count | Validity days | Require holder name |
|---|---|---|---|
| Concert ticket | 1 | empty (use event end date) | no |
| Festival 3-day wristband | 3 | empty | yes |
| Amusement park day pass | 0 (unlimited) | 1 | yes |
| Season pass | 0 (unlimited) | 365 | yes |
| 10-visit punch card | 10 | 365 | yes |
Related topics
- Creating a product — basic fields that also apply to tickets
- Categories — a ticket needs at least one category
- Digital products — another shipping-free product type