

Editing content
The practical workflow — find the page, open a block, edit the content, and save
This article walks through the practical steps for editing content in the Putiikkipalvelu dashboard. If you haven't yet read the overview of how content management works, start there.
1. Open Content Management
In the dashboard's left menu you'll find Content Management. The pages there are split into three sections:
- Homepage — your store's front page, in its own card. If your store has no editable homepage yet, the card shows a Create homepage button.
- Your pages — content pages such as "About us" or "Price list". Published pages appear in the store's top navigation. Create a new one with the Create new page button.
- Legal pages — the privacy policy, payment and delivery terms and the legal guarantee page, shown in the store footer. See Legal pages for details.
Which pages your store has depends on what your developer has built.
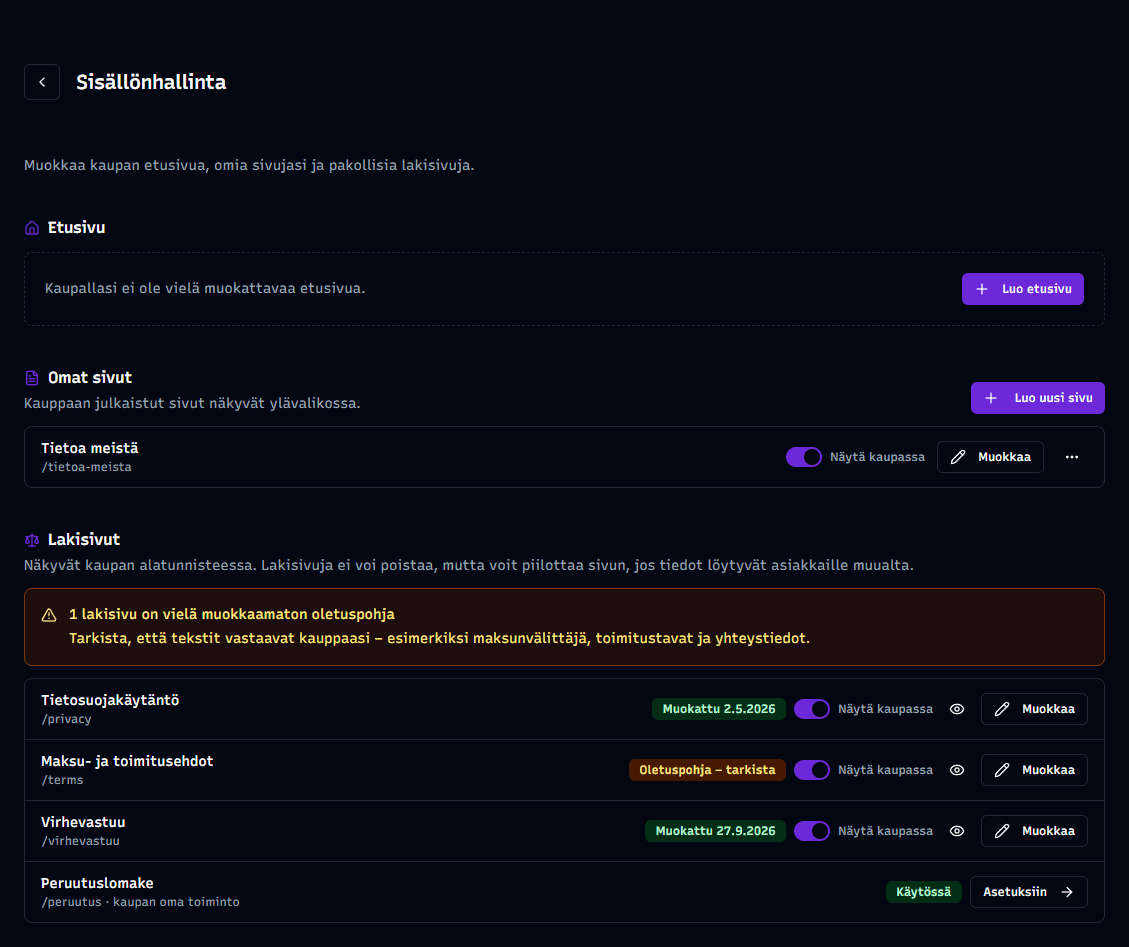
Each row has:
- Page name and its URL (e.g.
/privacy) - Show in store toggle — controls whether the page is shown in the store. A hidden page is not in the navigation and its address does not open for customers.
- Edit button — opens the block editor for the page
- Preview — for your own pages it is in the row's ⋯ menu, together with Delete. Legal pages have preview behind the eye icon and cannot be deleted.
Click Edit when you want to update the page's content.
2. The page edit view
The edit view splits into two columns:
- On the left: the page's basic info (title, description) and the list of blocks
- On the right: the preview, which updates automatically as you make changes
Page basics vs. URL
You can edit the page's title and description. The page's URL (slug) is locked — changing it would require a code change from your developer, since the developer references the page in code by this exact identifier.
3. Editing blocks
The block list shows all the page's blocks in order. Each block is initially collapsed, showing only its title and a short summary of its content.
Open a block for editing by clicking its title row — the block expands and you see all its fields.
Make changes directly in the fields:
- Text fields — type or edit
- Rich text editor — use the toolbar for formatting (headings, bold, lists, links)
- Image fields — drag an image in or click to choose a file from your computer
The preview on the right updates automatically.
Block key
Some blocks may have a key field (e.g. main-hero or info-contact). This is an identifier intended for the developer, used in code to reference this exact block.
Don't change the key yourself
If a block has a key, your developer probably references it in code. Changing the key may hide the block from visitors even if the content is saved. Don't touch the key field without instructions from your developer.
4. Save your changes
When you're happy with your changes, click the Save page button at the top of the page or in the sticky bar at the bottom (visible as you scroll).
Changes take effect immediately after saving — visitors see the updated content on your site on the next page load.
Preview before saving
You can always check your changes in the right-hand preview before saving. If something looks wrong, you can discard changes by refreshing the browser (before saving) or revert the fields manually.
Adding, deleting, and reordering blocks
The edit view also has an Add block button. It opens a picker dialog showing all 13 block types grouped into four categories.
You can also:
- Reorder blocks by dragging them by the handle on the block's left edge
- Delete with the trash icon
Handle blocks with care
Adding, deleting, or reordering blocks can affect the website in surprising ways. Your developer may reference individual blocks in code by their key or position — if you delete or move them, the page can develop empty gaps or its layout can break.
Don't add or remove blocks on your own unless your developer has explicitly told you to. Editing existing content is always safe — structural changes are not.
Related topics
- Content management overview — how the developer and merchant share the work
- Legal pages — privacy policy, terms and legal guarantee
- Text & content blocks — text-focused blocks
- Images & media blocks — image blocks
- Sections & layouts blocks — page-level structural sections
- Shop & info blocks — store-specific blocks